Rocky Linux has a lot of fantastic security features. Some of them come with a price, though.
If you have enabled Disk Encryption when installing Rocky Linux, you probably noticed that it asks for a password every single time you need to reboot – not something that is ideal for a piece of infrastructure. So how do we fix this? One option is to disable disk encryption entirely. Of course, then you lose the additional security offered by encryption. So how do we proceed? Well, there is a solution. I was able to piece the solution together with snippets from forum posts and comments, but there was no step-by-step guide or instruction set on how to do this, so here we are.
Here are the steps required to unlock the disk on boot:
- Identify the encrypted partition
- Create a new key file for partition encryption
- Add the new key to the encrypted partition
- Modify the crypttab file to include the keyfile
- Create a new dracut configuration that allows access to the keyfile during the boot process
- Reload dracut
- Reboot
It’s worth noting that I am running all of these commands as root. This particular server is set up just for learning and testing, and I don’t particularly care about security. As a best practice, you should perform all of these actions as a superuser, and not as root. I have included details on the commands to use if you are not root at the end of each section.
Identify the Encrypted Partition
Execute the lsblk command to list your partitions. The Partition Type will be crypt.
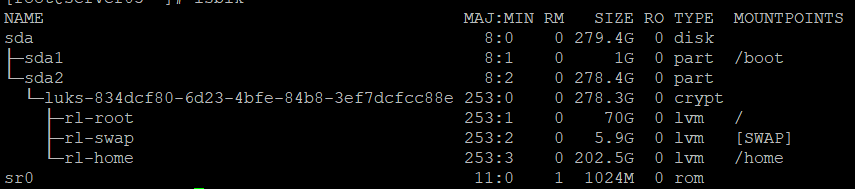
This shows that sda2 is encrypted with a name of luks-834dcf80-6d23-4bfe-84b8-3ef7dcfcc88e. Looking at this name, we can see that it has some text followed by what appears to be a UUID. This is the way that Rocky Linux set up the disk by default during the installation process, so your results may be a little bit different. In this example, the sda2 partition is encrypted and contains three mount points: rl-root, rl-swap, and rl-home. We do need to know the UUID of the disk to complete the setup – fortunately there is a command just for that:
cryptsetup luksUUID /dev/sda2
Now that we have the UUID of the encrypted partition, we can begin the process to unlock it at boot.
SuperUser Differences
sudo cryptsetup luksUUID /dev/sda2Create a new keyfile
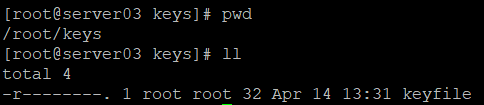
The partition is already encrypted, and we have to enter a password every time the system boots in order to unlock the disk. We could use the same password, but there is a better way. We can create a file that is filled with random data and use that to unlock the drive. I created a new folder /root/keys to store the keyfile and generated a random 32-byte file in that folder. After that I set the permissions on both the file and folder to set read only access for the file owner only.
mkdir /root/keys
dd if=/dev/random bs=32 count=1 of=/root/keys/keyfile
chmod -R 400 /root/keys/
There is now a keyfile in my /root/keys folder:
SuperUser Differences
Use the following commands:
sudo mkdir /root/keys
sudo dd if=/dev/random bs=32 count=1 of=/root/keys/keyfile
sudo chown -R root:root /root/keys/
sudo chmod -R 400 /root/keys
Add the Keyfile to the encrypted partition
Rocky Linux uses Linux Unified Key Setup for disk encryption. We need to add our new keyfile to the LUKS key store for our drive. First, we should validate the current list of keys for the disk, as well as confirm that we have a working passcode or passphrase. We will use the luksDump mechanism to list the existing entries. You can run the command as is, but I like to add grep to the end to specifically search for the luks string. These next commands will list the key number for each key that is assigned to /dev/sda2, followed by a test to ensure we understand the passphrase being used. There is also a command that will validate that an existing passkey is valid, which I have also included.
cryptsetup luksDump /dev/sda2 | grep luks

cryptsetup luksOpen --test-passphrase --key-slot 4 /dev/sda2 && echo correct

cryptsetup luksOpen --key-file /root/keyfile --test-passphrase --key-slot 1 /dev/sda2 && echo correct
You do not need to enter all three commands – if you have a known password or passphrase, you can use that. Otherwise, you will need to use the –key-file flag to identify the location of your current keyfile.

Now we are ready to add our new key to the keystore.
cryptsetup luksAddKey /dev/sda2 /root/keys/keyfile
You can optionally specify an existing keyfile by using the –key-file flag:
cryptsetup luksAddKey --key-file /root/keyfile /dev/sda2 /root/keys/keyfile
The system does not generate any output, but you can verify that a new entry has been created by running the dump command again. There should now be one additional entry.

You can validate that the new entry uses your keyfile using the command used to test passphrases earlier:

SuperUser Differences
sudo cryptsetup luksDump /dev/sda2 | grep luks

sudo cryptsetup luksOpen --test-passphrase --key-slot 4 /dev/sda2 && echo correct

sudo cryptsetup luksOpen --key-file /root/keyfile --test-passphrase --key-slot 1 /dev/sda2 && echo correct

sudo cryptsetup luksAddKey /dev/sda2 /root/keys/keyfile

/sudo cryptsetup luksAddKey --key-file /root/keyfile /dev/sda2 /root/keys/keyfile
Modifying the crypttab file
Just like Linux uses fstab to know which file systems to mount, it uses crypttab to know how to access encrypted file systems. We have configured our system to be unlocked with our keyfile – we just need to tell the operating system that it needs to unlock that partition. If your crypttab file doesn’t exist, create it using your favourite text editor. I’m a big fan of nano, so that’s what I use.
nano /etc/crypttabThe format of a crypttab entry is Volume Name, Encrypted Device, Key file, and Options. Here is what my file looks like:

This matches all the information we have seen so far. The volume name should match what we saw when running the lsblk command. The UUID was obtained using cryptsetup luksUUID. We generated the Key File with random data. The options I have used are discard and keyfile-timeout. Discard allows requests to be passed through to an encrypted block device. This improves SSD performance, but may have security implications. The keyfile-timeout of 10 seconds is there to prevent the system from hanging if the file is corrupted or missing. After the timer expires the system will look for an alternate method – typically this will be manually typing the password.
SuperUser Differences
sudo nano /etc/cyrpttabConfigure Dracut
Rocky Linux uses Dracut to create a file system that is accessible during the boot process, called initramfs. Without getting into too much detail, the initramfs image is a set of files that the operating system needs to have access to in order to start up – things like the drivers required to mount the boot disk. In this case, we are going to have to add our keyfile to the dracut configuration so that the keyfile is available during the boot process.
echo install_items+=/root/keys/keyfile > /etc/dracut.conf.d/copy-keyfile.conf This command will create a file called copy-keyfile.conf in the /etc/dracut.conf.d folder. Next we need to recompile the initramfs file to include our newly added configuration item by running dracut -f.

We can confirm that the keyfile is referenced in our initramfs by running lsinitrd | grep keyfile:

SuperUser Differences
sudo echo install_items+=/root/keys/keyfile >> /etc/dracut.conf.d/copy-keyfile.conf
sudo dracut -f.
sudo lsinitrd | grep keyfile
Reboot
This has been a lot! We have created a new keyfile for our disk and assigned it to unlock during the boot process. We included the keyfile in our initramfs file so that the operating system could access it before mounting the disk. Now all that remains is a reboot! Give your server a restart – when it starts back up, it should no longer prompt for a password. I’m still learning, so let me know if I’ve missed anything, or if this process doesn’t work for you.
Views: 38