I have been using Amahi as the back end of my home server setup for a very long time, but it appears that the project has been abandoned. I tasked myself with coming up with a new solution and landed on installing Rocky Linux and using Docker for most of my applications. I also split the load between two servers, as I had an extra kicking around. The only real problem? Amahi uses Greyhole for drive pooling, and I don’t want to have to migrate my 60TB library to a new solution.
Greyhole is a really neat utility, and it has served my purpose well over the years. It works by creating links from a folder called the Landing Zone to files on mounted storage drives. It provides the utility I need with minimal overhead, and it is accessible from a Windows environment without any additional effort. The obvious solution was to load Greyhole into the new environment. Of course, I had no idea what I was getting myself into. It turns out there is no documentation to support the installation and use of Greyhole with Rocky Linux. I tried to follow the documentation as it was written and ran into quite a few issues. The automatic installer didn’t work for me at all. There is a setup wizard that loads a small web server to configure Greyhole for the first time, but it won’t load if you’re using SELinux which Rocky enables by default. So I decided I would install it manually and modify the installation to fit my environment.
Building the Environment
To create a consistent environment I wanted to ensure I had the same folder and user structure across my servers. I built a user and group for docker and assigned them the UID and GID 1500. I have a folder in the root of my servers called /docker/ that contains all of the resources I want to share between containers and applications on each server. By using the same path across all servers, I am able to ensure that when applications interact they don’t have to know which server the application is running on – the files will always be in the same place. I am also mounting my Samba shares in the /docker/mnt/ folder – these shares will be managed by Greyhole. I created the folder structure for /docker/mnt/ with all the shares I intend to use.
/docker
└── mnt
    ├── anime
    ├── backups
    ├── books
    ├── movies
    ├── music
    ├── pictures
    ├── software
    └── tv
I also need a folder for Greyhole. The Greyhole folder needs to contain my drives and a landing zone. I have six drives, so I created folders drive1 through drive6 and mounted my storage drives to these folders. I’m going to assume that if you’re at this point you already know how to mount disks in Linux, so I won’t cover this. I do want to talk about what Greyhole is expecting, though. Greyhole storage pool disks require a single folder called /gh/ in the root of the disk. If you are creating a new Greyhole storage pool, you will need to create the /gh/ folder in each disk in your pool. Greyhole also requires a Landing Zone. I will talk briefly about the landing zone, as there are some considerations.
The Landing Zone is an important piece of the Greyhole puzzle. It is the source of the Samba shares that we will be mounting. All files that need to be written to the storage pool are put in the landing zone. Greyhole constantly monitors the landing zone for new files, and when it finds a new file it moves the file to the drive pool and creates a symbolic link to the file in the landing zone. The number one concern for the landing zone is the available storage space. While Greyhole will move the files out of the landing zone, it is not instant. The landing zone needs to be sufficiently large to hold any files you are copying to Greyhole. In my previous implementation I had an entire disk that was dedicated to the Greyhole landing zone, but I have not done that this time around. I may still do that at some point – it’s as easy as stopping Greyhole, copying the entire /greyhole/ folder to a disk, then mounting the disk in the /greyhole/ folder. My Landing Zone folder structure now looks like this:
/greyhole/
├── drive1
│   ├── gh
├── drive2
│   ├── gh
├── drive3
│   ├── gh
├── drive4
│   ├── gh
├── drive5
│   ├── gh
├── drive6
│   ├── gh
└── lz
    ├── anime
    ├── backups
    ├── books
    ├── movies
    ├── music
    ├── pictures
    ├── software
    └── tv
Note that the structure of /greyhole/lz/ matches the structure of /docker/mnt/ – this will be important later. For now, let’s look at the commands I ran to create all these structures.
sudo groupadd -g docker
sudo usermod -aG docker docker
sudo mkdir /docker
sudo mkdir /docker/mnt
sudo mkdir /docker/mnt/anime
sudo mkdir /docker/mnt/backups
sudo mkdir /docker/mnt/books
sudo mkdir /docker/mnt/movies
sudo mkdir /docker/mnt/music
sudo mkdir /docker/mnt/pictures
sudo mkdir /docker/mnt/software
sudo mkdir /docker/mnt/tv
sudo chown -R docker:docker /docker
sudo chmod -R 770 /docker

sudo mkdir /greyhole
sudo mkdir /greyhole/drive1
sudo mkdir /greyhole/drive2
sudo mkdir /greyhole/drive3
sudo mkdir /greyhole/drive4
sudo mkdir /greyhole/drive5
sudo mkdir /greyhole/drive6
sudo mkdir /greyhole/lz
sudo mkdir /greyhole/lz/anime
sudo mkdir /greyhole/lz/backups
sudo mkdir /greyhole/lz/books
sudo mkdir /greyhole/lz/movies
sudo mkdir /greyhole/lz/music
sudo mkdir /greyhole/lz/pictures
sudo mkdir /greyhole/lz/software
sudo mkdir /greyhole/lz/tv
sudo chown -R docker:docker /greyhole
sudo chmod -R 770 /greyhole
The Database
Greyhole requires an SQL database for basic functionality. For this implementation I went with MySQL. I installed MySQL and secured it with a root password. We also need a database for Greyhole and a user that Greyhole can use to access that database.
First, install MySQL:
sudo dnf install -y mysql-server
sudo dnf install -y php-mysqlnd
sudo service mysqld start
sudo systemctl enable mysqld
Confirm that mySQL is running:
sudo systemctl status mysqld
mysqld.service - MySQL 8.0 database server
     Loaded: loaded (/usr/lib/systemd/system/mysqld.service; enabled; preset: d>
     Active: active (running) since Sat 2025-03-08 11:48:22 AST; 2 weeks 3 days>
   Main PID: 1206 (mysqld)
     Status: "Server is operational"
      Tasks: 46 (limit: 199408)
     Memory: 167.8M
        CPU: 1d 1h 19min 57.949s
     CGroup: /system.slice/mysqld.service
             └─1206 /usr/libexec/mysqld --basedir=/usr
Next, MySQL needs to be properly secured.
Run the MySQL Secure Access Wizard:
sudo mysql_secure_installationThe Wizard will prompt for some information – the responses used for our example are included in Bold. The password I used here for root will satisfy the security requirements for any validation policy, but set a password that makes sense in your environment.
MySQL Secure Access
Would you like to setup VALIDATE PASSWORD component? Y
There are three levels of password validation policy:
LOW    Length >= 8
MEDIUM Length >= 8, numeric, mixed case, and special characters
STRONG Length >= 8, numeric, mixed case, special characters and dictionary file
Please enter 0 = LOW, 1 = MEDIUM and 2 = STRONG: 0
Please set the password for root here. MySQLr00t
Do you wish to continue with the password provided?(Press y|Y for Yes, any other key for No) : Y
Remove anonymous users? (Press y|Y for Yes, any other key for No) : Y
Disallow root login remotely? (Press y|Y for Yes, any other key for No) : Y
Remove test database and access to it? (Press y|Y for Yes, any other key for No) : Y
Reload privilege tables now? (Press y|Y for Yes, any other key for No) : Y
Now that the MySQL database has been secured, we need to create the MySQL structures that Greyhole requires. We can launch MySQL and log in as the mySQL root user:
mysql -u root -p
Enter the root password you set in the previous step when prompted. You should be presented with the MySQL Monitor:
mysql -u root -p
Enter password:
Welcome to the MySQL monitor.  Commands end with ; or \g.
Your MySQL connection id is 17366
Server version: 8.0.41 Source distribution

Copyright (c) 2000, 2025, Oracle and/or its affiliates.

Oracle is a registered trademark of Oracle Corporation and/or its
affiliates. Other names may be trademarks of their respective
owners.

Type 'help;' or '\h' for help. Type '\c' to clear the current input statement.

mysql>
Now we can create the greyhole database and user, and assign the correct permissions.
CREATE DATABASE greyhole;
CREATE USER 'greyhole_user'@'localhost' IDENTIFIED BY 'MySql_gr3yhole';
USE greyhole;
GRANT ALL PRIVILEGES ON greyhole.* TO 'greyhole_user'@'localhost';
exit
Install and Configure Samba
The backbone of Greyhole is Samba – Windows File Sharing. We need to install the software that enables this functionality.
sudo dnf install -y cifs-utils samba-client sambaNext we need to create a configuration file. There should be a sample file at /etc/samba/smb.conf, but the Greyhole configuration is a bit more complex. Here is my full smb.conf file – be sure to modify it to suit your environment:
[global]
   workgroup = dyck
   netbios name = server01
   log file = /var/log/samba/%m.log
   log level = 0
   preferred master = yes
   os level = 60
   time server = yes
   security = user
   large readwrite = yes
   dos charset = CP850
   unix charset = UTF8
   wins support = yes
   unix extensions = no
   wide links = yes
   force user = docker
   force group = docker

[homes]
   browseable = no
   writeable = yes
   create mask = 0644
   directory mask = 0755

[printers]
   comment = All Printers
   path = /var/spool/samba
   browseable = yes
   guest ok = no
   writeable = no
   printable = yes

[anime]
   path = /greyhole/lz/anime
   browseable = yes
   writeable = yes
   guest ok = no
   create mask = 0770
   directory mask = 0770
   dfree command = /usr/bin/greyhole-dfree
   vfs objects = greyhole

[backups]
   path = /greyhole/lz/backups
   browseable = yes
   writeable = yes
   guest ok = no
   create mask = 0770
   directory mask = 0770
   dfree command = /usr/bin/greyhole-dfree
   vfs objects = greyhole

[books]
   path = /greyhole/lz/books
   browseable = yes
   writeable = yes
   guest ok = no
   create mask = 0770
   directory mask = 0770
   dfree command = /usr/bin/greyhole-dfree
   vfs objects = greyhole

[movies]
   path = /greyhole/lz/movies
   browseable = yes
   writeable = yes
   guest ok = no
   create mask = 0770
   directory mask = 0770
   dfree command = /usr/bin/greyhole-dfree
   vfs objects = greyhole

[music]
   path = /greyhole/lz/music
   browseable = yes
   writeable = yes
   guest ok = no
   create mask = 0770
   directory mask = 0770
   dfree command = /usr/bin/greyhole-dfree
   vfs objects = greyhole

[pictures]
   path = /greyhole/lz/pictures
   browseable = yes
   writeable = yes
   guest ok = no
   create mask = 0770
   directory mask = 0770
   dfree command = /usr/bin/greyhole-dfree
   vfs objects = greyhole

[software]
   path = /greyhole/lz/software
   browseable = yes
   writeable = yes
   guest ok = no
   create mask = 0770
   directory mask = 0770
   dfree command = /usr/bin/greyhole-dfree
   vfs objects = greyhole

[tv]
   path = /greyhole/lz/tv
   browseable = yes
   writeable = yes
   guest ok = no
   create mask = 0770
   directory mask = 0770
   dfree command = /usr/bin/greyhole-dfree
   vfs objects = greyhole
There are a few things to note. The Global section has some changes – we need to enable wide links and I have chosen to force the user and group. I also have Unix Extensions disabled. There are also two lines added to the end of every share that are specific to Greyhole. These are required for every Greyhole share.
Samba is installed and configured, but we don’t want to start it yet. The Greyhole stuff that we have included isn’t going to work because we haven’t installed Greyhole yet.
SELinux
SELinux is Linux Kernel module that provides an improved mechanism for securing the file system.I will be completely honest: I don’t have a great grasp on SELinux. I’m doing my best to learn how to use it, but for now I’m going to be light on the details. At a very high level, there are three portions to an SELinux Security Policy The user, the role, and the type. For this implementation, I only touched the type. The Landing Zone needs to be configured as a Samba Share type and the docker folder needs to be configured as a Container File type. I also enabled a global flag to allow all Samba shares to have read/write permissions.
sudo semanage fcontext -a -t samba_share_t "/greyhole/lz(/.*)?"
sudo semanage fcontext -a -t container_file_t "/docker(/.*)?"
sudo restorecon -Rv /docker/
sudo restorecon -Rv /greyhole/
setsebool -P samba_export_all_rw=1
Manual Greyhole Installation
I tried to use the documented methods to deploy Greyhole, but I ran into roadblocks all over the place. I eventually decided I would just build it from scratch. This was easy enough to accomplish, as it is well documented. I used the latest version of Greyhole that was available at the time. Please check to see if there is a new version of Greyhole and modify the commands appropriately.
First, I need to download some of the prerequisite packages.
sudo dnf install -y heimdal-devel
sudo dnf install -y chkconfig
sudo dnf install -y initscripts
sudo dnf install -y lm_sensors-libs
Next, I download and install Greyhole. The documentation says to run all of these commands as root. You will notice that I don’t have any sudo commands here – I did log in as root to do this. This is definitely not a best practice, but I’m not sure what would happen if I didn’t run them as root. Let me know if you run into any issues trying to do this installation without gaining root access first.
cd /greyhole
wget https://github.com/gboudreau/Greyhole/releases/download/0.15.25/greyhole-0.15.25.tar.gz
tar -xvf greyhole-0.15.25.tar.gz
cd greyhole-0.15.25
GREYHOLE_INSTALL_DIR=`pwd`
mkdir -p /var/spool/greyhole
mkdir -p /var/spool/greyhole
chmod 777 /var/spool/greyhole
mkdir -p /usr/share/greyhole
install -m 0755 -D -p greyhole /usr/bin
install -m 0755 -D -p greyhole-dfree /usr/bin
install -m 0755 -D -p greyhole-php /usr/bin
install -m 0755 -D -p greyhole-dfree.php /usr/share/greyhole
install -m 0644 -D -p schema-mysql.sql /usr/share/greyhole
install -m 0644 -D -p greyhole.example.conf /usr/share/greyhole
install -m 0644 -D -p greyhole.example.conf /etc/greyhole.conf
install -m 0644 -D -p logrotate.greyhole /etc/logrotate.d/greyhole
install -m 0644 -D -p greyhole.cron.d /etc/cron.d/greyhole
install -m 0755 -D -p greyhole.cron.weekly /etc/cron.weekly/greyhole
install -m 0755 -D -p greyhole.cron.daily /etc/cron.daily/greyhole
cp -r web-app /usr/share/greyhole/web-app
install -m 0755 -D -p scripts-examples/greyhole_file_changed.sh /usr/share/greyhole/scripts-examples
install -m 0755 -D -p scripts-examples/greyhole_idle.sh /usr/share/greyhole/scripts-examples
install -m 0755 -D -p scripts-examples/greyhole_notify_error.sh /usr/share/greyhole/scripts-examples
install -m 0755 -D -p scripts-examples/greyhole_send_fsck_report.sh /usr/share/greyhole/scripts-examples
install -m 0755 -D -p scripts-examples/greyhole_sysadmin_notification.sh /usr/share/greyhole/scripts-examples
install -m 0644 -D -p USAGE /usr/share/greyhole
install -m 0755 -D -p build_vfs.sh /usr/share/greyhole
install -m 0644 -D -p docs/greyhole.1.gz /usr/share/man/man1/
install -m 0644 -D -p docs/greyhole-dfree.1.gz /usr/share/man/man1/
install -m 0644 -D -p docs/greyhole.conf.5.gz /usr/share/man/man5/
LIBDIR=/usr/lib
mkdir "$LIBDIR/greyhole"
cp samba-module/bin/$SMB_VERSION/greyhole-$(uname -m).so "$LIBDIR/greyhole/greyhole-samba${SMB_VERSION//.}.so"
install -m 0644 -D -p greyhole.systemd /usr/lib/systemd/system/greyhole.service
There is a lot happening in these commands, but the upshot of all these commands is that we are copying the files Greyhole needs to the locations that Greyhole expects. There is still a missing piece though – there is no Samba module in Greyhole for the version of Samba I am running. I need to compile it myself.
SMB_VERSION="`smbd --version | awk '{print $2}' | awk -F'-' '{print $1}' | awk -F'.' '{print $1,$2}' | tr ' ' .`"
$GREYHOLE_INSTALL_DIR/build_vfs.sh current
cp $GREYHOLE_INSTALL_DIR/samba-module/vfs_greyhole-samba-4.x.c $GREYHOLE_INSTALL_DIR/samba-module/vfs_greyhole-samba-4.20.c
cp $GREYHOLE_INSTALL_DIR/samba-module/wscript-samba-4.x.patch $GREYHOLE_INSTALL_DIR/samba-module/wscript-samba-4.20.patch
UPDATE: June 2025 – Samba 4.21
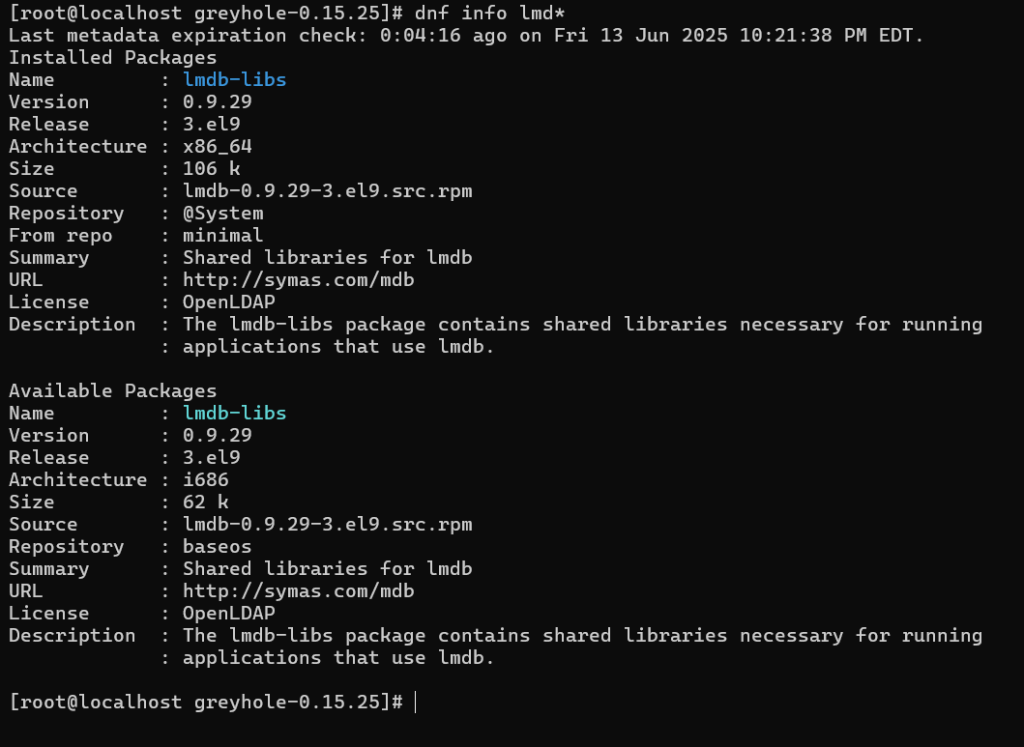
I updated my packages last night and Samba was updated to 4.21.3. According to my notes, all I should need to do is recompile the VFS module. Unfortunately when ran the commands to update the module it created a zero-byte file. The greyhole script was doing everything it was supposed to, but it calls a configure command from the samba library, and that script was failing. Fortunately the script did output the answer for me.

The script is complaining that I don’t have lmdb installed at a minimum version of 0.9.16 or later. But I do!
I suspect it’s probably a naming convention issue. If I knew what the different commands were I could probably alias the command and I would be able to proceed, but I decided to take the path of least resistance – modifying the script! Looking back at the error I encountered, it said that this package was required unless I specified --without-ldb-lmdb. So all I needed to do was figure out how to add that to the configuration script! Without going into too much detail, the build_vfs.sh script calls a program called configure that is part of the Samba package. The variables that are being passed to configure need to include the --without-ldb-lmdb flag.
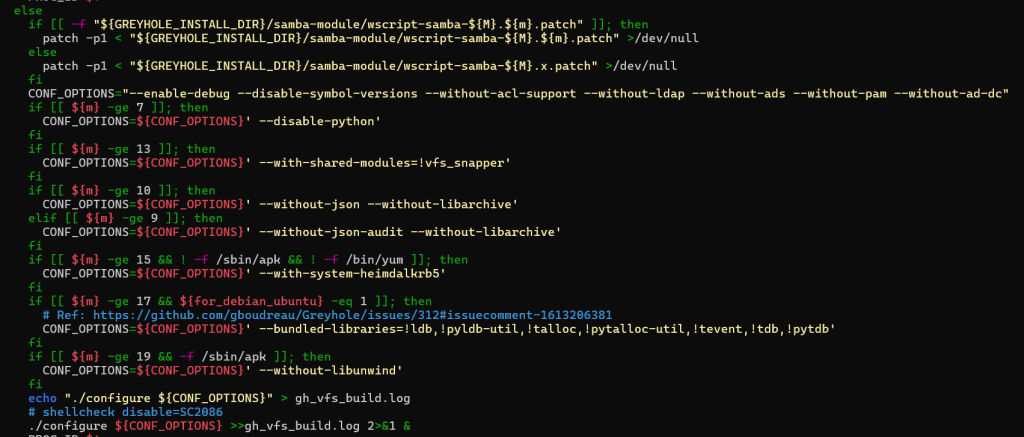
At Row 160 of the file there is an if statement that ultimately executes the configure command. The Else section of this If statement had a whole bunch of flags that were being added based on the $m variable. That was set earlier in the script and is based on the Samba version number.
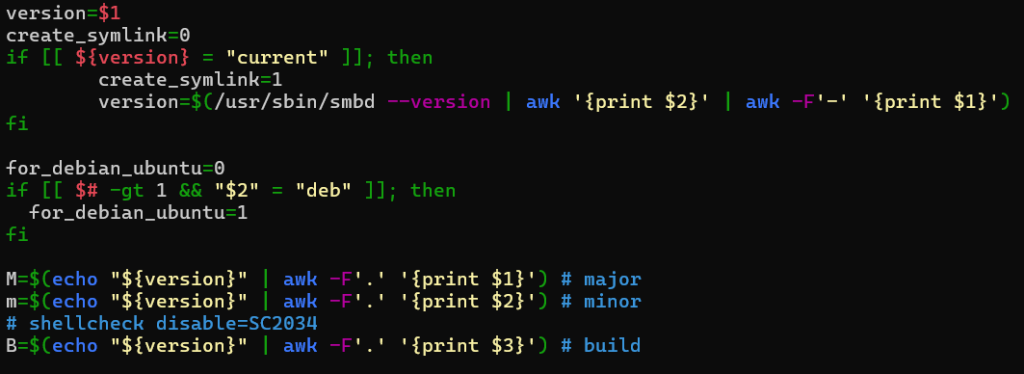
I can get the value of that variable easily enough! A few lines in the shell and I’ve got my output.
version=$(/usr/sbin/smbd --version | awk '{print $2}' | awk -F'-' '{print $1}')
M=$(echo "${version}" | awk -F'.' '{print $1}')
m=$(echo "${version}" | awk -F'.' '{print $2}')
B=$(echo "${version}" | awk -F'.' '{print $3}')

echo "M: "$M && echo "m: "$m && echo "B: "$B
The output breaks down the Major and Minor version numbers as M and m, and the Build number as B.
M: 4
m: 21
B: 3
So I need to modify the build_vfs.sh script to add the –without-ldb-lmdb if the minor version is equal to or greater than 21. That should be easy enough, right? I dropped my if statement in at line 195:
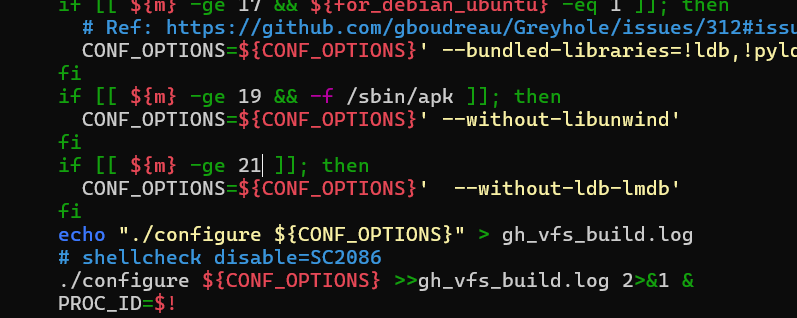
    if [[${m} -ge 21 ]]; then
      CONF_OPTIONS=${CONF_OPTIONS}'  --without-ldb-lmdb'
    fi
This if statement says that if the minor version is greater than or equal to 21 we will add the required flag. Now I can run the script successfully!
End of Update
One of the files that was installed is the sample configuration file, located at /etc/greyhole.conf.. Edit the file to reflect your environment, paying close attention to the db_user and db_pass fields. These need to match the credentials you set up for your MySQL database. This config file reflects what we have done here, along with a handful of useful settings. For more information, refer to the sample config file or Greyhole’s official documentation. This is how mine looks.
    db_host = localhost
    db_user = greyhole_user
    db_pass = MySql_gr3yhole
    db_name = greyhole
    log_level = DEBUG
    log_memory_usage = no
    check_for_open_files = yes
    num_copies[anime] = 1
    num_copies[backups] = 2
    num_copies[books] = 2
    num_copies[movies] = 1
    num_copies[music] = 1
    num_copies[pictures] = 2
    num_copies[software] = 1
    num_copies[tv] = 1
    storage_pool_drive = /greyhole/drive1/gh, min_free: 10gb
    storage_pool_drive = /greyhole/drive2/gh, min_free: 10gb
    storage_pool_drive = /greyhole/drive3/gh, min_free: 10gb
    storage_pool_drive = /greyhole/drive4/gh, min_free: 10gb
    storage_pool_drive = /greyhole/drive5/gh, min_free: 10gb
    storage_pool_drive = /greyhole/drive6/gh, min_free: 10gb
    check_storage_pool_schedule = *:00
    drive_selection_algorithm = most_available_space
    df_cache_time = 15
    delete_moves_to_trash = yes
    modified_moves_to_trash = yes
    ignored_files = \..*\.[0-9a-zA-Z]{6}
    ignored_files = [0-9A-F]{8}\.tmp
    ignored_files = \.DS_Store
Fixing the Greyhole Implementation
Now that Greyhole has been deployed, we need to fix some issues. The Greyhole service requires two services to be running before it can start: mysql and smbd. I found that the smbd service was blocking Greyhole from starting, so I did some digging. Rocky Linux refers to the service as smb, not smbd. To fix this, we need to edit the Greyhole service file. Use your favourite text editor to modify the /usr/lib/systemd/system/greyhole.service file. The third line contains the required services. Change the line to reflect the correct service name. This is what your file should look like when you are done:
[Unit]
Description=Greyhole
Requires=mysqld.service smb.service
After=syslog.target network.target mysqld.service

[Service]
Type=simple
ExecStartPre=/usr/bin/greyhole --test-config
ExecStart=/usr/bin/greyhole --daemon
ExecReload=/usr/bin/kill -HUP $MAINPID
ExecStopPost=/usr/bin/greyhole --process-spool
Restart=always
RestartSec=5

[Install]
WantedBy=multi-user.target
Once the service file has been modified, be sure to reload the Systemctl Daemon:
systemctl daemon-reloadMount Shares Locally Service
Greyhole does not like having files added directly to the landing zone. There is a well-documented service that will mount the Greyhole shares locally. If you are content having your shares mounted at /mnt/samba/ you can use the default script. Because I wanted to use /docker/mnt/ as the local mount point, I needed to modify the script. A credentials file is also required – this file should contain two lines:
username=docker
password=********
I created the password file at /greyhole/.smb_credentials
Now that we have a credentials file we need to modify the mount_shares_locally service. I changed the mount point and the password file location. Note the changes:
#!/bin/bash
#
### BEGIN INIT INFO
# Provides:          mount_shares_locally
# Required-Start:    $network $local_fs $remote_fs smb mysqld
# Required-Stop:     $network $local_fs $remote_fs smb
# Default-Start:     2 3 4 5
# Default-Stop:      0 1 6
# Short-Description: mount Samba shares locally
### END INIT INFO

username="docker"

if [ -f /etc/rc.d/init.d/functions ]; then
        . /etc/rc.d/init.d/functions
fi

start () {
        uid=`id -u $username`
        gid=`id -g $username`

        echo -n $"Mounting Samba shares locally: "
        mkdir -p /docker/mnt/
        cd /docker/mnt
        testparm -s /etc/samba/smb.conf 2>/dev/null | grep "^\[" | grep -v "\[global\]\|\[homes\]\|\[netlogon\]\|\[sysvol\]\|\[printers\]" | awk -F'[' '{print $2}' | awk -F']' '{print $1}' | xargs -d "\n" mkdir -p
        sleep 5
        opt="credentials=/greyhole/.smb_credentials,uid=${uid},gid=${gid},file_mode=0660,dir_mode=0770,nobrl,hard,_netdev,iocharset=utf8,noserverino,mfsymlinks"
        if mount.cifs 2>&1 | grep vers= >/dev/null; then
                opt="$opt,vers=3.0"
        elif man mount.cifs 2>&1 | grep vers= >/dev/null; then
                opt="$opt,vers=3.0"
        fi
        while IFS='' read -r d; do
                if [ "`mount | grep "//127.0.0.1/$d/* on " | wc -l`" = "0" ]; then
                        /sbin/mount.cifs "//127.0.0.1/$d" "$d" -o $opt
                else
                        echo "  Share [$d] is already mounted."
                fi
        done < <(testparm -s /etc/samba/smb.conf 2>/dev/null | grep "^\[" | grep -v "\[global\]\|\[homes\]\|\[netlogon\]\|\[sysvol\]\|\[printers\]" | awk -F'[' '{print $2}' | awk -F']' '{print $1}')
        touch /var/lock/subsys/mount_shares_locally
        success $"$base startup"
        echo
        return 0
}

stop () {
        echo -n $"Unmounting locally mounted Samba shares: "
        /bin/umount -l /docker/mnt/*
        rm -f /var/lock/subsys/mount_shares_locally
        success $"$base shutdown"
        echo
        return 0
}

restart () {
        stop
        start
}

case "$1" in
        start)
                start
                ;;
        stop)
                stop
                ;;
        restart)
                restart
                ;;
        *)
                echo $"Usage: $0 {start|stop|restart}"
                exit 1
                ;;
esac

exit $?
The mount_shares_locally service needs to be set as an executable script and loaded into systemd:
sudo chmod +x /etc/init.d/mount_shares_locally
sudo systemctl enable mount_shares_locally
Bringing it all together: The final steps
Let’s recap – we have done a lot already. Here is what has happened so far:
- Created our folder structure
- Installed MySQL
- Configured Samba
- Configured SELinux to allow our shares to work
- Built a storage pool
- Manually installed Greyhole
- Modified the Greyhole configuration to suit our environment
There isn’t much left to do at this point. We have completed all of the configuration that was required, and now we just have to start everything. We will need to reload the System Daemon to recognise the changes we made to the greyhole service. Then we need to load the Samba service and the Greyhole service. Finally, we can mount our shares locally using the mount_shares_locally service.
sudo systemctl daemon-reload
sudo service smb start
sudo service greyhole start
sudo service mount_shares_locally start
If you have done this properly, Greyhole should copy anything that hits your Samba Shares (locally at /docker/mnt or remotely at //<<server-ip-or-fqdn>>/<<share-name>>) to the drive pool. You can check the status of your drive pool using the Greyhole command line. Here is my output:
#greyhole -s

Greyhole Statistics
===================

Storage Pool
                        Total -   Used =   Free +  Trash = Possible
  /greyhole/drive1/gh:  5544G -  2479G =  2786G +    67G =  2853G
  /greyhole/drive2/gh:  5081G -  2039G =  2785G +    12G =  2798G
  /greyhole/drive3/gh:  7392G -  4242G =  2777G +    64G =  2841G
  /greyhole/drive4/gh: 14783G - 11253G =  2786G +    66G =  2852G
  /greyhole/drive5/gh: 16696G - 13075G =  2783G +    82G =  2865G
  /greyhole/drive6/gh: 18551G - 14835G =  2785G +    36G =  2822G
                       ==========================================
  Total:               68048G - 47922G = 16703G +   327G = 17030G
If you are migrating an existing pool, you will want to run a full fsck with the options to delete orphaned metadata, to find orphaned files, and to fix any broken symlinks.
sudo greyhole --fsck --delete-orphaned-metadata --find-orphaned-files --fix-symlinksLet me know if you are able to replicate my results. I did A LOT of stuff that isn’t included in this guide, but I’ve pared it down to just what I think I need to include. If you are having difficulty, let me know. We may be able to set up a working session to figure it out together, then I can update my docs.
Views: 9